

If you are curious about using the popular static site generator Astro as a frontend application to interact with a Motoko backend canister on the Internet Computer, then this article is great for you.
For more on Astro checkout the link below.
This starter kit / example presented here gives you a ready to use environment to get you up and running with Astro + Svelte on the Internet Computer. Besides that, it includes a more sophisticated Motoko backend canister code than a simple helloWorld example.
Short note on your own behalf. Svelte and Astro are also used in the IC Academy courses about the Internet Computer. Although this setup is used for my own development, I’m happy to share it with all of you.
Let’s start.
Behind the Scenes
This starter kit / example provides a frontend and a backend canister. The frontend canister hosts the built Astro application and the backend canister provides the relevant Motoko backend code based on the use case described below. How the application looks like can be seen in a screenshot below.
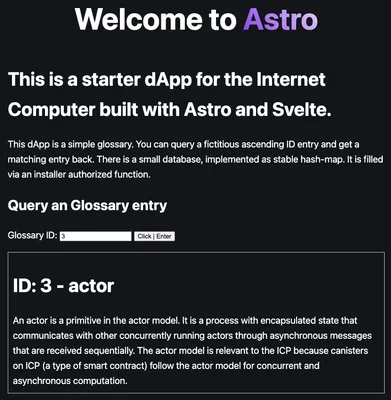
How the application looks like.
The use case for this example is a simple glossary database with an ID for each glossary entry. This schema can stand for everything. However, I wanted to use something meaningful.
The Astro frontend application uses its Islands architecture to host a Svelte component. This component queries a specific ID and receives the glossary entry for that ID if it exists, or nothing if no entry is assigned to the ID. Here, the Motoko Result object is used to deliver type safe returns.
All glossary entries are stored in a stable hash map. For this purpose, an external hash map library is used to store all entries.
What’s interesting here is that this external library is integrated with MOPS, a Motoko package manager.
The backend code provides a function called installer that you use to install some sample data.
Please note, that this function is tied to a given principal ID, so that the sample data can only be installed or updated from an authorized identity. You must modify this in backend/main.mo.
# replace the adminPrincipal in backend/main.mo with the principal of your local dfx identity
let adminPrincipal = "yziij-iujbv-ygpuv-....";
Both, the frontend and the backend, are connected with the official JavaScript agents provided by the Dfinity foundation. No third party tool is needed.
Well, you see there is a lot packed into that example.
How to Use It
You can use the starter kit for different use cases:
- For frontend development, within the local development server.
- For backend development. Test your backend canister by using the CLI or the Candid user interface which is deployed automatically on your local replica.
- For a full test deployment with frontend and backend canister to the local replica.
- For a complete and free of cycles test deployment on the Motoko playground.
- For real project deployments to the IC mainnet.
Requirements
To follow this example some requirements must be met. To learn more on the needed requirements to develop applications on the Internet Computer checkout the official documentation:
or one of my other blog posts:
This article provides a fast Track for you to get up and running.
This fast Track allows you to quickly get started with this example and to study the source code on your own. This is recommended for experienced developers who know how to do it. Simply follow the steps below.
However, there is an Extended Track. This track provides you with more information about how you can create such an application step by step. But, the Extended Track is so much more.
It is processed as a complete 100% online course that helps you in your transition from a Web 2.0 to a Web 3.0 developer. This course is currently under heavy development.
Register to our newsletter and we will keep you updated about the course development progress.
Fast Track - Ready to Build
To clone and use the Github repository for your own purpose following the commands below. Note to get a clean git repository. A tool named digit is used. Make sure you have installed it. If you have not installed it yet, you can do it with the following command.
npm install -g degit
Perparation
mkdir myapp && cd myapp

# install ic-mops in case you don't have it yet
npm i -g ic-mops

npx degit https://github.com/samlinux-development/ic-astro-svelte
npm install
dfx start --clean --background
Set adminPrincipal in backend/main.mo
To control who can update the glossary database, set your principal ID before deploying the backend canister.# Get the principal of your local dfx identity
dfx identity use <identity-name> || dfx identity use default
dfx identity get-principal
# replace the adminPrincipal in backend/main.mo with the principal of your local dfx identity
let adminPrincipal = "yziij-iujbv-ygpuv-...";
Deploy to local Internet Computer replica
Once the Principal ID is set, deploy both the frontend and backend canisters to the local replica and install the glossary database.dfx deploy
dfx canister call backend installer
Deploy to the Motoko Playground
The same could be done on the Internet Computer mainnet. To test your application use the Motoko playground. It offers a 30 minute cycle free environment to test your application under real circumstances.dfx deploy --playground
dfx canister --network playground call backend installer
👏 Congratulations, you have successfully deployed an Astro frontend application and a Motoko backend canister on a local Internet Computer replica running on your machine or on the Motoko playground.
Time for a challenge
✅ Change your identity-name to a different one and try to install the glossary database again. Try it locally and as well on the Motoko playground. What happens?
Usage of the application
Now it’s time to use it in your browser. For both deployment versions you can call the frontend canister and use the application. Watch out the console logs for the correct URLs.
Open your browser and use the following URL scheme:
- Frontend canister via browser: http://127.0.0.1:4943/?canisterId[frontend-canister-Id]
- Backend canister via Candid interface: http://127.0.0.1:4943/?canisterId=[candid-canister-id]&id=[backend-canister-Id]
Now, you can start working on your own project. Let’s build something big!
The complete and working repository can be found on Github:
Don’t forget to register to our newsletter and we will keep you updated about the course development progress.


