Let’s start with the basics and some terms.
What is the Internet Computer ?
The Internet Computer is a general-purpose blockchain that provides a public platform for hosting tokens and decentralized applications (dApps). It acts as a complete technology stack, allowing systems and services to be built that run entirely from the blockchain. Some of its key characteristics include being very fast, cheap to host smart contracts, governed by on-chain governance and upgrades, and environmentally friendly.
The Internet Computer is a blockchain that enables developers, organizations, and entrepreneurs to build and deploy secure, autonomous, and tamper-proof canisters, an evolution of smart contracts. It provides a globally-accessible, public blockchain for running smart contracts at web speed, that can serve interactive web content to users. It runs a secure cryptographic protocol operated by node machines in independent data centers all over the world, guaranteeing the secure execution of smart contracts. It is a network of independent blockchains, known as subnets, connected using chain-key cryptography that can scale out its capacity as required.
For end-users, the experience of interacting with a decentralized application on the Internet Computer is the same as it is on a public or private cloud. For the people creating and managing those services, the Internet Computer eliminates many of the costs, risks, and complexities associated with developing and deploying modern applications and microservices. It supports interoperability, shared functions, permanent APIs, and ownerless applications, persists data automatically in memory, and simplifies the technology stack that IT organizations need to integrate and manage.
What is a Canister ?
A canister, in the context of the Internet Computer, is a computational unit that bundles together both code and state. It’s essentially a form of smart contract, but with additional capabilities that makes it suitable for building internet-scale services. Canisters can define functions that can be called by external services, such as browsers or mobile apps, or that can be called by other canisters.
What is Svelte ?
Svelte is a modern JavaScript framework used for building user interfaces. It shifts the work typically done at runtime to compile time, producing highly optimized and efficient code.
Unlike other frameworks that run in the browser, Svelte compiles components into highly optimized JavaScript at build time, resulting in smaller bundle sizes and improved performance during runtime. It simplifies development by providing a declarative syntax for building reactive UI components while aiming to reduce the amount of code developers need to write.
The Svelte Starter
There are several starter kits out there that help you get started. Some are official ones provided by the Dfinity foundation in their official repository on Github and some are from enthusiastic developers like me.
According to latest developer notes, starter kits for several popular frontend frameworks will be provided in the near future included in the dfx new command.
However, it’s not the worst thing to know what goes on behind the scenes and how the individual components are connected.
This Svelte starter kit presented here gives a ready to use environment to get you up and running with Svelte on the Internet Computer.
Svelte is also used on most IC Academy courses about the Internet Computer. Although this setup is used for my own development, I’m so happy to share it with all of you.
Behind the Scenes
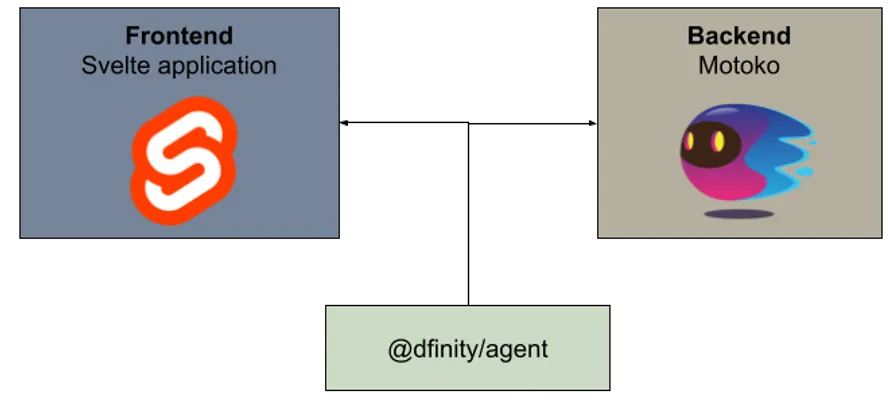
The starter kit provides a frontend and a backend canister. The frontend canister hosts the build Svelte application and the backend canister provides a starting Motoko sayHello function.
Both, the frontend and the backend, are connected with the official JavaScript agents provided by the Dfinity foundation. No third party tool is needed.

Overview of the starter kit
How to Use It
You can use the starter kit for different use cases:
- For frontend development, within the local development server.
- For backend development, test your backend canister by using the CLI or the standard UI which is deployed automatically on your local replica.
- For a full test deployment with frontend and backend canister to the local replica.
- For real project deployments to the IC mainnet.
Requirements
- Make sure you have installed Node.js. Node.js version greater than version 18 is required.
- Make sure you have installed DFX.
- For Windows users, make sure you have installed WSL 2 and Node.js greater than version 18 (WSL 2 only includes Node.js 10.x at the time of writing this article. DFX requires a Node.js version greater than 18.)
DFX, also known as the DFINITY command-line execution environment, is the primary tool for creating, deploying, and managing decentralized applications (dApps) for the Internet Computer platform.
To install dfx on your Mac, open your computer terminal and run the following command:
sh -ci "$(curl -fsSL https://smartcontracts.org/install.sh)"
Windows users need the Windows subsystem for Linux or short WSL 2 support. To set up DFX for Windows follow the guide provided by the Internet Computer homepage.
To verify that dfx has been properly installed on your operating system, run:
dfx --version
The current version at the time of writing this article is 0.22.0.
To verify your Node.js version, run the following command in your terminal.
node --version
This article provides a fast Track for you to get up and running.
This fast Track allows you to quickly get started with this starter kit. This is recommended for experienced developers who know how to do it. Simply follow the steps below.
However, there is an Extended Track. This track provides you with more information about how you can set up a starter kit for your development environment step by step. But, the Extended Track is so much more.
It is processed as a complete 100% online course that helps you in your transition from a Web 2.0 to a Web 3.0 developer. This course is currently under heavy development.
Register to our newsletter and we will keep you updated about the course development progress.
Fast Track - Ready to Build
To clone and use the Github repository for your own purpose following the commands below. Note to get a clean git repository. A tool named digit is used. Make sure you have installed it. If you have not installed it yet, you can do it with the following command.
npm install -g degit
mkdir ic-svelte && cd ic-svelte
npx degit https://github.com/samlinux-development/ic-svelte
npm install
dfx start --clean --background
dfx deploy
dfx canister id frontend
Open your browser and use the following URL scheme:
- http://[canisterId].localhost:4943
- http://127.0.0.1:4943/?canisterId=[canisterId]
To get the frontend canister Id use the following command:
dfx canister id frontend
👏 Congratulations, you have successfully deployed a Svelte frontend application and a Motoko backend canister on a local Internet Computer replica running on your machine.
Now, you can start working on your own project. Let’s build something big!
A further starter kit is also available for svelteKit.


