

👋 Let’s find it out.
First, allow me to demonstrate how I have addressed the issue. The following illustration provides a framework for the set up. By the way, this method is applied for the blog you are currently reading.
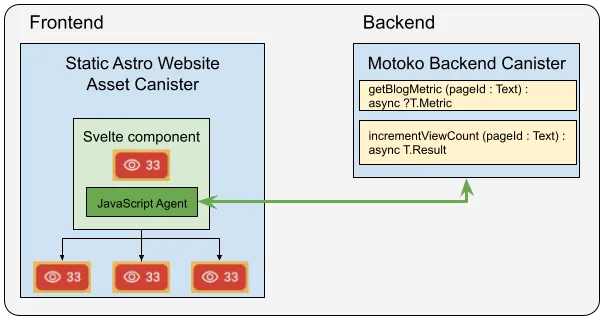
Illustration of the context
The Astro Frontend
Astro, as a static site generator (SSG), outputs fully-prepared HTML sites with minimal client-side JavaScript involvement. As the website is static rather than a Single-Page Application (SPA), it is necessary to devise a straightforward and user-friendly method for interfacing with a backend hosted on a canister on the IC.
To facilitate it, JavaScript is required to establish a secure connection. More technically speaking, a JavaScript Agent from @dfinity/agent is needed to manage the connection. A simple JSON request doesn’t currently work.
Here, Svelte becomes relevant. Utilising a small and compact Svelte component with approx. 87 KB, you can adopt a familiar and straightforward method to establish a connection with the IC. While Vanilla JS is also an option, Svelte was chosen for this example. Svelte is very widespread among developers and you could use even more Svelte specific features.
The presented Svelte component is fully equipped to retrieve the view count and perform a simple animation once the data is loaded. On a blog details page the component also increments the page view as well, with a dedicated update call to the backend canister. Since you use the same component for both situations, this behaviour is parameterized. This enables the use of this Svelte component anywhere on the Astro website. Whether in the detailed view of a blog post or within the card list view of all blog posts, the component functions independently. Also every request to the backend is handled autonomously through the Actor model for concurrent and asynchronous computation.

An actor is a primitive in the actor model. It is a process with an encapsulated state that communicates with other concurrently running actors through asynchronous messages that are received sequentially. In the context of the IC, actors are relevant because canisters on the IC (a type of smart contract) follow the actor model for concurrent and asynchronous computation.
Actors can modify their own private state, but can only alter other actors indirectly through messages. They are a part of the actor model which is used by canisters for concurrent and asynchronous computation.
In the Motoko programming language an actor is written in code and defines public shared functions that can be accessed from outside the IC. A client, like a laptop or a mobile phone, can send a request over the internet to call one of the public functions defined in an actor.

This is how the view counter looks like.
To maintain optimal website performance, the Svelte component queries the data immediately before entering the viewport. Consequently, page views for e.g. card elements not currently visible on the frontend are not queried.
To determine when the component should issue a request to the IC, the JavaScript function getBoundingClientRect() is used. This method returns a DOMRect object, which provides details about an element’s size and its position relative to the viewport. Using this information, you can calculate the optimal time for a component to execute a request to the IC.
This Svelte integration can be implemented across the Astro islands, where an island represents any interactive UI component on the page. Envision an island as an interactive widget surrounded by a sea of static, lightweight, server-rendered HTML. Read more on that interesting approach in a post by Preact creator Jason Miller on August 11, 2020.
The final frontend code required to fetch the number of blog views is quite concise and can be summarised in a single line as shown below. The line utilises the backend object derived from the ready-to-use JavaScript actor represented through the backend object which is automatically generated by the dfx generate command. A few more lines of code and the magic of Svelte will do the rest 😀.
const result = await backend.getBlogMetric(pageId);
  if(result[0]){
    pageView = result[0].view;
  }
Setting up the JavaScript agent to connect to the backend canister requires a bit more work. Once that’s done, executing a function independent of the query or update function is really easy, as you can see above.
At this point, I would like to take this opportunity to once again point out our StarterKits which can be used to easily study the connection between frontend and backend.
Next, have a deeper look at the backend. While the backend code is somewhat more sophisticated, it remains manageable.
The Backend
For the backend, Motoko is used as a language. Motoko is the native language of the IC. However, you can use other languages as well like Rust, TypeScript or Python for the same use case.
Conversely, on the backend side, there is a requirement for a mechanism to record the view count of each page, alongside additional metric data, and potentially other information in the future. See the type Metric later in this article.
Below is the whole dedicated Motoko code. The stable Map library by Zhenya Usenko — credits to him — is used, available for installation at mops.one/map to store the metric data in a canister update resistant way. The rest is pretty straightforward. There are two functions: getBlogMetric and incrementViewCount.
The function getBlogMetric accepts a pageId in text format and returns a Result object containing the page metric. Similarly, the function incrementViewCount also takes a pageId, retrieves the existing view count for the page and increments it if it exists: If not, it creates a new entry for that specific pageId in the store. In either case, the updated page view count is returned.
import Text "mo:base/Text";
import T "./types";
import Map "mo:map/Map";
import { thash } "mo:map/Map";

actor BlogBackendService {
  // The map of metrics.
  stable let map = Map.new<Text, T.Metric>();

  // Get the metric for a pageId.
  public query func getBlogMetric(pageId : Text) : async ?T.Metric {
    return Map.get(map, thash, pageId);
  };

  // Increment the view count of a pageId.
  public func incrementViewCount(pageId : Text) : async T.Result {
    switch (Map.get(map, thash, pageId)) {
      // If there is no entry for the id, create a new one.
      case null {
        let newMetric:T.Metric = {view = 1};
        Map.set(map, thash, pageId, newMetric);
        return #ok newMetric;
      };
       // If there is an entry for the id, inc the view count + 1
      case (?metric){
        let newMetric:T.Metric = {view = metric.view + 1};
        Map.set(map, thash, pageId, newMetric);
        return #ok newMetric;
      };
    };
  };
};
For the used types see: types.mo
import Nat "mo:base/Nat";
module Types {
  //The result type of given pageId
  public type Result = {
    #ok: Metric;
    #err;
  };

  // The main store type of the service.
  public type Metric = {
    view: Nat;
  };
};
A brief aside here: When deploying a canister like this on the IC mainnet, you can review and execute all public methods via the IC dashboard.
If you select a random canister, you might be able to see all public methods and have the opportunity to invoke the functions. This is possible because the candid:service metadata section in your dfx.json file is public by default.
This issue can be addressed by simply adding the following lines (note the metadata object) to the corresponding canister section in the dfx.json file.
"backend": {
  "main": "backend/main.mo",
  "type": "motoko",
  "metadata": [
     {
       "name": "candid:service",
       "visibility": "private"
      }
   ]
}
Wrap Up
As demonstrated, a compelling solution emerges from the integration of various techniques. This example shows how a static website operated on the IC can be expanded to include dynamic content. It shows a way to address a common Web 2 development task and transfer it on the IC.
Note that in this scenario both the frontend and backend code are executed as a smart contract on the IC blockchain in a decentralised way. A dedicated firewall or similar protective measures are not required.
As no authentication method is used to protect the view counter, this approach is not 100% secure. However, for this use case it is secure enough.
Now you know a bit more about dynamic content on the IC, happy coding. 🚀
Don’t forget to register to our newsletter and we’ll keep you up to date on similar exciting topics related to the use of the Internet Computer.


