

👋 Happy to share my new starter kit
What is the Problem?
There are several starterKits for different frontend JavaScript Frameworks out there and all of them are based on the .env file. The .env file is automatically generated by the dfx deploy command and contains all relevant canister Ids and network information which are needed for the deployment process. To get this .env file generated a property in the dfx.json file must be set.
"output_env_file": ".env"
All relevant starterKits import this .env file during the build process to get the right environment variables for the frontend application build, especially in the default actor implementation which is created by the dfx generate command.
However, Angular does not use this .env file per default. It has its own environment file implementation. The project’s src/environments/ directory contains the base configuration file, environment.ts, which provides configuration for production build. That would be the place to store our environment variables, especially CANISTER_ID_BACKEND, DFX_NETWORK and DFX_HOST. Now, the question arises if you have to set these variables manually or if there is a better solution.
The answer is that there is a better solution. In this post I will discuss and compare two different approaches for that.
First of all, let’s recap what is required to connect a frontend application with an Internet Computer canister. You need the following when it comes to the frontend build:
- The Id bkyz2-fmaaa-aaaaa-qaaaq-cai of the canister you are going to connect.
- The target network (local, playground, ic-mainnet).
- Based on the target network, the right host, because for local deployment you need http://127.0.0.1:4943, for the Motoko Playground https://icp0.io and for the ic-mainnet https://ic0.app.
- A JavaScript agent as a communication layer for the frontend canister with an actor and declarations to call the publicly accessible functions in the canister.
- A specific host or a development proxy to redirect all /api calls to http://127.0.0.1:4943 for local development.
Solution 1 - with .env file and custom-webpack
You can find solution 1 on Github. Check out the source code for more information.
Summing up, solution 1 is based on a custom-webpack-configuration. This approach is well known. The configuration does essentially two things:
- Imports the needed variables with webpack’s EnvironmentPlugin and
- Provides a devServer proxy to redirect all /api calls to http://127.0.0.1:4943 (see custom-webpack.config.js)
As a result, you can call process.env[‘CANISTER_ID_BACKEND’] in the Angular service to get access to those values to interact with a canister (see ic.service.ts).
To use this approach some further adjustments have to be made:
- Install some additional npm packages (see package.json). @dfinity/agent@1.0.0, @dfinity/candid@1.0.0, @dfinity/principal@1.0.0, @types/globalthis@1.0.4, @types/node@20.11.16, @angular-builders/custom-webpack@17.0.0, globalthis@1.0.3, dotenv@16.4.1
- Modify angular.json to let it know about the custom-webpack builder and define the path to the customWebpackConfig custom-webpack.config.js. This has to be done twice, for the build and for the serve configuration. Additionally packages have to be set under the allowedCommonJsDependencies (buffer, base64-arraybuffer, simple-cbor, borc, globalthis/polyfill) to get rid of TypeScript errors (see angular.json).
- Modify tsconfig.app.json and add “node” under the types array (see tsconfig.app.json).
- Add a custom-webpack.config.js file to the project root directory with propper code (see custom-webpack-config.js).
In the Angular src folder add the following to the src/main.ts and add a quick fix.
// temporary fix until @dfinity/agent-js replaces the legacy CBOR parser
import getGlobalThis from 'globalthis/polyfill';
(window as any).global = getGlobalThis();
The last step is to create an Angular service to make the calls to the canister - in my case to a Motoko canister - called backend (see src/app/ic.service.ts).
In this service I have reimplemented the pre generated actor. This actor is automatically created by the dfx generate backend command and located under src/declarations/backend/index.js.
The reason for the reimplementation is, because everytime you execute this command the declarations and this file will be rewritten and any changes made are gone. However, for solution 1 there is no change needed for that file. Therefore, it is also possible to import this file into the service and use the automatically created actor.
But, Angular 17 comes with a new esbuild builder to speed up the build process. As I observed that this new builder is not included in the custom-webpack builder configuration yet, leads me to solution 2.
Solution 2 - with Angular Environment Implementation
You can find solution 2 on Github. Check out the source code for more information.
In summary, this approach does not require any custom-webpack-configuration to get access to .env file variables because it uses the Angular built in environment approach. It uses a hidden folder structure called .dfx/, located in the project root folder and automatically created through the dfx deploy command.
In short, it uses an environment template file (see environment.template.ts) to rewrite the environment.ts file according to the current deployment situation and replaces the placeholder values with the right ones. This rewrite happens automatically through a script (see deploy.js) triggered by the npm prebuild process. See also packages.json for further modifications on the script settings.
As a result, you can call environment.BACKEND_CANISTER_ID in the Angular service to interact with a canister (see ic.service.ts).
To get this approach working the following modifications have to be set:
- Install some additional npm packages (see package.json).@dfinity/agent@1.0.0, @dfinity/candid@1.0.0, @dfinity/principal@1.0.0, @types/globalthis@1.0.4, globalthis@1.0.3, @types/node@20.11.16, dotenv@16.4.1, ejs@3.1.9
- Modify angular.json to let it know about the browser-esbuild builder if you want. Additionally packages have to be set under the allowedCommonJsDependencies (buffer, base64-arraybuffer, simple-cbor, borc, globalthis/polyfill) to get rid of TypeScript errors (see angular.json).
- Add the deploy.js script to a new folder called scripts (see deploy.js).
- Replace package.json file with the one from the repository (see package.json).
- The Angular specific modifications (src/main.ts and ic.service.ts) are the same as in solution 1.
To understand how it works, it is important to mention that another directory is created, called .dfx/, and is typically located in the root folder of the project.
This directory contains several subdirectory according to the proven deployment method. The important part is that all of these directories contain a file called canister_ids.json with the right canister Ids for that deployment method. This is the information needed for the deploy.js script to rewrite the environment.ts file for the build.
// canister_ids.json
{
  "backend": {
    "local": "br5f7-7uaaa-aaaaa-qaaca-cai"
  },
  "frontend": {
    "local": "bw4dl-smaaa-aaaaa-qaacq-cai"
  }
}
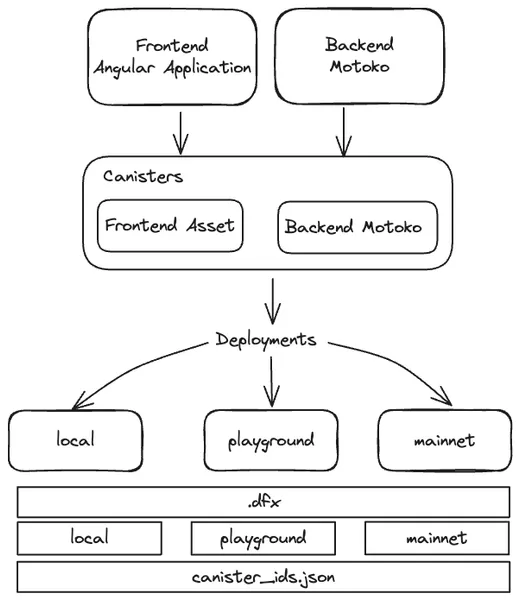
The illustration clarifies this connection.
Differences Summarized
As seen, both approaches are usable but differ in some points. One difference I haven’t mentioned yet is the developer experience regarding usage of both approaches.
For approach 1 you can use the default dfx deploy command to deploy your dapp to the local replica, playground or ic mainnet or run the Angular development server with ng serve.
For approach 2 you have to use different commands like:
- npm run start —network=local, for ng serve
- npm run deploy —network=[local, playground, ic], for a deployment against the chosen network
One further difference is the build system. If you want to profit from the new esbuild system, then solution 2 fits your needs because the custom-webpack does not support esbuild at the moment.
Now, you can start working on your own project. Let’s build something big!
Don’t forget to register to our newsletter and we will keep you updated about the course development progress.


